
Learning how to clean electric baseboard heaters safely protects both your home and your heating system, since these units sit low on the wall and carry live electrical components behind a simple metal cover. A wrong step here carries real risk, unlike dusting a shelf.
This guide walks through the full process specifically for electric units, since electric and hydronic systems don’t actually share the same safety steps, even though many guides lump them together. You’ll get a clear, standalone process built only for electric heaters.
Table of Contents
- What Is an Electric Baseboard Heater?
- Why Cleaning Electric Baseboard Heaters Safely Matters
- Signs Your Electric Baseboard Heater Needs Cleaning
- Safety Precautions Before You Start
- Tools You’ll Need
- How to Clean Electric Baseboard Heaters Safely: Step by Step
- Vacuuming the Fins Correctly
- Checking for Obstructions Around the Heater
- Inspecting Wiring for Damage
- Testing the Thermostat After Cleaning
- Common Noises After Cleaning and What They Mean
- Electric vs Hydronic: Why the Cleaning Steps Differ
- How Often to Clean Electric Baseboard Heaters
- Mistakes to Avoid When Cleaning Electric Units
- Frequently Asked Questions
- Final Thoughts
What Is an Electric Baseboard Heater?
An electric baseboard heater warms a room using a resistance coil housed inside a metal casing along the wall. Electricity passes through the coil, heating it, and the surrounding fins radiate that warmth into the room.
Unlike hydronic units, which rely on hot water pumped from a boiler, electric baseboard heaters are fully self-contained. There’s no plumbing involved, which makes them simpler to install but also means the entire heating process depends on a single electrical circuit.
Because everything runs on electricity rather than water, cleaning an electric unit safely means treating it more like an appliance than a radiator, with moisture kept strictly away from the internal coil at every step.
Why Cleaning Electric Baseboard Heaters Safely Matters
Dust and debris trapped inside the fins insulate the heating coil, forcing it to work harder to reach the same temperature. Over time, this reduces efficiency and quietly raises your electricity bill.
There’s also a safety dimension unique to electric units. Heavy dust buildup near a live heating element can, in rare cases, contribute to overheating, which is one more reason cleaning electric baseboard heaters safely matters more than a purely cosmetic chore.
Regular cleaning additionally reduces the amount of dust and allergens recirculated into your living space every time the heater cycles on, which matters for households managing allergies or asthma symptoms.
Signs Your Electric Baseboard Heater Needs Cleaning
Watch for these common indicators that dust has built up enough to affect performance:
- A burning-dust smell during the first use of the season
- Visibly clogged or fur-covered fins when you check behind the cover
- A room that heats more slowly than it used to
- Rising electricity bills without any change in thermostat habits
- Humming, buzzing, or ticking sounds while the unit runs
If you notice two or more of these signs, it’s a strong indicator that a full cleaning session is overdue and shouldn’t wait until the unit stops working altogether.
Safety Precautions Before You Start
Because electric baseboard heaters carry live current, safety steps here matter more than they would for a purely mechanical household task. Follow these precautions every time.
- Switch off the dedicated circuit breaker, not just the wall thermostat, before touching any part of the unit
- Wait until the unit is completely cool before removing the cover
- Never use water, spray cleaners, or damp cloths anywhere near the heating coil
- Avoid metal tools directly on or near the electrical element
- Keep children and pets away from the area while the cover is off
Once the breaker is confirmed off and the unit has cooled, you’re ready to move into the actual cleaning process.
Tools You’ll Need
Gather these supplies before starting so the process stays quick and uninterrupted:
- Vacuum cleaner with a brush and crevice attachment
- Soft-bristle brush or an old paintbrush
- Dry microfiber cloth for the exterior cover
- Compressed air canister for tight gaps between fins
- Needle-nose pliers for straightening bent fins
- Flathead screwdriver, in case the cover is screwed rather than clipped
Since electric units require strictly dry cleaning near the coil, notice that water and cleaning solution are intentionally left off this list, unlike tools used for hydronic systems.
How to Clean Electric Baseboard Heaters Safely: Step by Step
Follow these steps for a safe, thorough clean specifically suited to electric units.
- Turn off the breaker for the circuit powering the heater, and confirm it’s off by checking that the unit stays cold.
- Remove the end caps by gently pulling them away from the mounting bracket, since most simply snap or slide free.
- Detach the front cover by lifting the bottom edge and pulling it toward you, away from the wall.
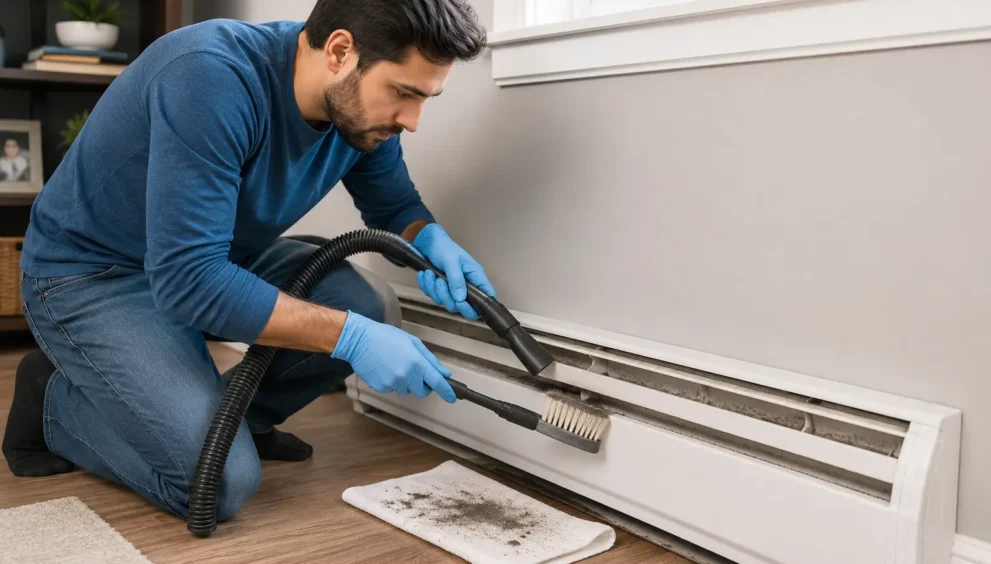
- Vacuum the fins thoroughly, using the crevice tool to reach between each one without applying too much pressure.
- Use compressed air on any gaps the vacuum nozzle can’t fully reach, especially near the ends of the unit.
- Inspect for bent fins and straighten them carefully with needle-nose pliers, working section by section.
- Wipe the exterior cover with a dry microfiber cloth only, avoiding any moisture near the coil itself.
- Reattach the cover and end caps, then restore power and confirm the unit runs quietly and evenly.
This process typically takes fifteen to twenty minutes per unit, and following it closely is the core of how to clean electric baseboard heaters safely without risking damage to the coil or wiring.
Vacuuming the Fins Correctly
The fins are where the majority of dust accumulates, since they sit directly in the path of the airflow the heater constantly pulls through. Getting this step right matters most.
Use the crevice tool rather than a wide nozzle, since it fits between individual fins without bending them. Move slowly along the full length of the unit rather than rushing through in one pass.
For particularly dense buildup, alternate between the vacuum and a soft brush, gently loosening compacted dust before vacuuming it away. This combination clears far more debris than vacuuming alone.
Avoid pressing the nozzle directly against the fins, since even a plastic attachment can bend them if pushed too firmly. A light touch, repeated a few times, works better than one aggressive pass.
Checking for Obstructions Around the Heater
Airflow around the unit matters just as much as airflow through the fins themselves. A perfectly clean interior still won’t heat efficiently if the surrounding area is blocked.
- Keep furniture at least six inches away from the front of the unit
- Trim curtains or drapes so they don’t hang over the top vents
- Clear rugs or floor items away from the bottom intake gap
- Avoid storing boxes or decor directly on top of the cover
Taking a moment to check these obstructions after cleaning ensures the heater can actually use the clean airflow path you just restored.
Inspecting Wiring for Damage
While the cover is off, take a moment to visually inspect the wiring connections, since this is the easiest access point you’ll have all year.
Look for any discoloration, fraying, or melted insulation around the wiring, as these are signs of a genuine electrical issue rather than something a cleaning session can fix.
If anything looks damaged, don’t attempt a repair yourself. Restore the cover loosely, avoid using the heater, and contact a licensed electrician to inspect and repair the wiring safely.
Routine wiring checks like this one catch small problems early, well before they become a bigger and more expensive repair or a genuine safety hazard.
Testing the Thermostat After Cleaning
Once the cover is back on and power is restored, testing the thermostat confirms everything is working correctly before you consider the job finished.
Adjust the temperature setting up and down and listen for the heater to respond within a minute or two. A delayed or absent response can point to a thermostat issue unrelated to cleaning.
If you have a programmable thermostat, verify that scheduled settings and any smart features still function as expected after the unit has been powered back on.
This quick test takes less than five minutes but confirms the entire system, from breaker to thermostat, is working properly after the cleaning process.
Common Noises After Cleaning and What They Mean
A properly cleaned unit should run quietly. If you hear unusual sounds after reassembly, here’s what they typically indicate.
| Sound | Likely Cause |
|---|---|
| Humming | Normal for some models, especially older units |
| Buzzing | Loose cover or panel not fully seated |
| Clicking | Metal expanding and contracting as it heats up, usually normal |
| Rattling | Loose end cap or bracket, not related to the coil |
| Persistent loud noise | Possible wiring or element issue, requires an electrician |
Most sounds after cleaning are mechanical and harmless, tied to loose panels rather than the coil itself. A persistent, loud, or new sound is the one worth having checked professionally.
Electric vs Hydronic: Why the Cleaning Steps Differ
Many general guides mix electric and hydronic instructions together, which causes confusion, since the two systems require genuinely different handling.
| Factor | Electric Baseboard Heater | Hydronic Baseboard Heater |
|---|---|---|
| Heat source | Resistance coil | Hot water from a boiler |
| Moisture near heat source | Never allowed | Lightly damp cloth is acceptable |
| Power-off step | Circuit breaker | Thermostat or zone valve |
| Unique maintenance task | Wiring inspection | Bleeding trapped air from the line |
| Risk if done incorrectly | Electrical shock or short | Water damage or leak |
If your home has hydronic units instead, the process differs enough that following electric-specific steps could leave dust behind or, in rare cases, introduce unnecessary risk.
How Often to Clean Electric Baseboard Heaters
Cleaning frequency depends on your household rather than a fixed calendar date. Most homes fall into one of these patterns:
- No pets, low dust: once a year, ideally before heating season
- Average household: once a year, in early fall
- One or two pets: twice a year, fall and spring
- Multiple pets or heavy carpeting: every three to four months
Cleaning before the season starts prevents the common burning-dust smell, while households with pets benefit from checking the fins more frequently throughout the winter.
Mistakes to Avoid When Cleaning Electric Units
A few common missteps turn a simple cleaning task into a bigger problem. Watch for these specifically with electric units.
- Using a damp cloth or spray cleaner anywhere near the coil
- Skipping the breaker shut-off because the thermostat “looks” off
- Forcing the vacuum nozzle too hard, bending the delicate fins
- Reassembling the cover before confirming the breaker works properly
- Ignoring visible wiring damage instead of calling an electrician
Avoiding these mistakes keeps the process both safe and effective, protecting the unit’s lifespan along with your own safety while working near live electrical components.
Frequently Asked Questions
Is it safe to clean an electric baseboard heater myself?
Yes, as long as you turn off the breaker first and avoid any moisture near the heating coil. The process is straightforward and doesn’t require special tools or professional experience to complete safely.
Can I use water to clean an electric baseboard heater?
Water should only touch the exterior cover, and even then, a dry cloth is safer. Never let water or cleaning spray reach the coil or wiring, since that creates a genuine shock risk.
How do I know if my electric baseboard heater’s wiring is damaged?
Look for discoloration, fraying, or melted insulation around the connections while the cover is off. Any of these signs means the unit needs a licensed electrician rather than a cleaning session.
Why does my electric baseboard heater smell when I turn it on?
That smell is dust burning off the coil after months of inactivity. A pre-season cleaning largely eliminates it, since there’s far less buildup left on the fins to burn away.
How often should electric baseboard heaters be cleaned?
Once a year is standard for most households, ideally before heating season begins. Homes with pets or heavy dust generally benefit from cleaning twice a year instead of just once.
What happens if I don’t clean my electric baseboard heater?
Dust buildup insulates the fins, forcing the unit to run longer and use more electricity to reach the same temperature. Over time, this raises your energy bill and adds strain to the coil.
Can dust cause an electric baseboard heater to overheat?
Heavy buildup can restrict airflow enough to contribute to overheating in rare cases. Regular cleaning keeps airflow clear and reduces this risk significantly compared to a neglected unit.
Final Thoughts
Cleaning an electric baseboard heater safely comes down to one core rule: keep moisture away from the coil and always start by switching off the breaker. Everything else follows naturally from there.
For a full walkthrough that also covers hydronic systems, fin repair, and seasonal upkeep, this guide’s complete pillar article on cleaning baseboard heaters covers the topic in even greater depth.
A clean electric baseboard heater runs quieter, heats faster, and lasts longer. A few careful minutes each fall keep your home warm safely through the entire winter season.