


How to Clean Your Conch Piercing Safely at Home
Introduction: Why Proper Cleaning Matters
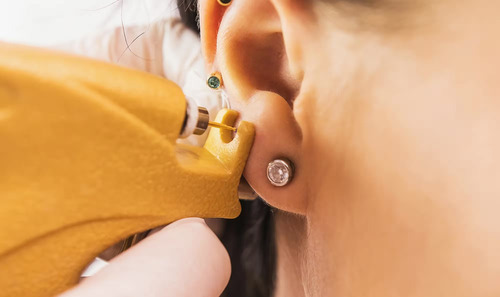
Getting a conch piercing is exciting, it’s bold, trendy, and adds a unique touch to your personality. But with every piercing comes responsibility. Proper cleaning of your conch piercing is essential to avoid infections, promote faster healing, and maintain the piercing’s shine.
When neglected, bacteria can build up around the jewelry, leading to redness, swelling, and discomfort. Fortunately, cleaning your conch piercing safely at home is easy if you follow the right steps and use safe products.
Understanding Conch Piercing
What Is a Conch Piercing?
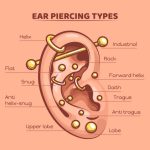
A conch piercing is placed in the middle part of your ear’s cartilage, the “conch shell”-shaped area. It can be styled with a stud, hoop, or barbell, depending on your taste.
Types of Conch Piercings: Inner vs. Outer
- Inner Conch: Located in the bowl-shaped area near the ear canal.
- Outer Conch: Placed on the flat area between the helix and antihelix.
Both look stunning but require consistent aftercare due to the dense cartilage in the area.
Common Healing Timeline and What to Expect
Stages of Healing
Healing time varies from 6 months to 12 months, depending on your immune system and aftercare routine.
- Initial stage (1–2 weeks): Mild redness, swelling, and tenderness.
- Intermediate stage (3–8 weeks): Crusting and gradual healing.
- Final stage (3–12 months): Skin closes around the jewelry.
Signs of Healthy vs. Infected Piercing
Healthy: Slight redness, minor swelling, and minimal discharge.
Infected: Persistent pain, yellow or green discharge, severe swelling, or heat around the area.
Tools and Products You’ll Need for Cleaning
| Product | Purpose | Notes |
|---|---|---|
| Saline Solution | Cleans and soothes | Use sterile, pre-made saline or DIY with sea salt and warm water |
| Cotton Pads / Q-Tips | Gently apply solution | Avoid using tissues or rough cloth |
| Mild Antimicrobial Soap | Optional for cleansing | Choose fragrance-free formulas |
| Paper Towels | To pat dry | Use only disposable ones |
Avoid These Common Cleaning Mistakes
- Never use alcohol or hydrogen peroxide they dry out tissue.
- Don’t rotate the jewelry.
- Avoid touching the piercing with dirty hands.
Step-by-Step Guide: How to Clean Your Conch Piercing Safely at Home
Step 1: Wash Your Hands Thoroughly
Always start with clean hands to prevent introducing bacteria.
Step 2: Prepare Your Cleaning Solution
Use a sterile saline solution or mix ¼ teaspoon of non-iodized sea salt with 1 cup of warm distilled water.
Step 3: Soak or Compress Method
- Soak Method: Dip your ear into a small cup filled with saline solution for 5–10 minutes.
- Compress Method: Soak a cotton pad in saline and gently press it against the piercing for a few minutes.
Step 4: Dry Gently
Pat dry with a clean paper towel or gauze; never rub the area.
Step 5: Repeat Twice Daily
Clean your piercing morning and night for at least the first 3 months.
What NOT to Do While Cleaning
Avoid Alcohol and Hydrogen Peroxide
These harsh solutions damage healthy tissue and delay healing.
Don’t Twist or Move Jewelry
Turning your jewelry causes micro-tears in the healing skin, increasing infection risk.
Skip Creams and Ointments
They can trap bacteria and block airflow around the wound.
Managing Common Issues and Irritations
Redness or Tenderness
Normal in the first few weeks. Use cold compresses to reduce swelling.
Lumps or Bumps
It could be caused by friction or improper cleaning. Stick to saline soaks and avoid changing jewelry too soon.
Discharge or Crust
Clear or white crust is normal. Gently clean it with saline-soaked Q-tips.
When to Seek Professional Help
Contact a piercer or doctor if:
- Swelling worsens after 2–3 days
- You have yellow or green discharge
- Pain becomes severe, or you develop a fever
Early treatment prevents long-term complications.
Tips for Faster Healing and Long-Term Care
- Use clean pillowcases and towels.
- Avoid sleeping on the pierced ear.
- Keep hair products, perfumes, and makeup away from the area.
- Eat healthy foods and stay hydrated, your body heals faster that way.
Aftercare Mistakes to Avoid
- Changing jewelry too early.
- Using dirty headphones or earbuds.
- Ignoring mild irritation signs.
- Swimming in pools or hot tubs during the early healing stages.
Recommended Products and Resources
| Product | Recommendation |
|---|---|
| NeilMed Piercing Aftercare Spray | A gentle, sterile saline spray is ideal for daily cleaning |
| H2Ocean Piercing Spray | Ocean-based formula that accelerates healing |
| Band-Aid Brand Paper Towels | Gentle, sterile saline spray is ideal for daily cleaning |
FAQs
1. How often should I clean my conch piercing?
Twice a day, once in the morning and once at night, for the first 3 months.
2. Can I use warm water alone to clean it?
Warm water helps, but saline solution is far more effective at removing bacteria.
3. How long until I can change my jewelry?
Wait at least 6–12 months or until your piercer confirms it’s fully healed.
4. My piercing is crusty. Should I remove it?
Yes, gently clean the crust with saline; it’s part of the healing process.
5. Can I shower with a fresh piercing?
Yes, but rinse thoroughly afterward to remove soap residue.
6. What happens if I skip cleaning for a few days?
Bacteria may build up, causing irritation or infection.
Conclusion
Cleaning your conch piercing safely at home doesn’t have to be complicated. By following a gentle, consistent routine and avoiding harsh chemicals, you’ll ensure a healthy healing process and a beautiful piercing that lasts a lifetime. Remember, patience and hygiene are the keys to success!
FOR MORE INFORMATION: Bloggingshub.com