


Conch Piercing Aftercare: Expert Tips for Fast Healing
OVERVIEW
Getting a conch piercing can be an exciting and stylish choice, but taking proper care of it is crucial to ensure fast healing and avoid infection. In this complete guide, we’ll share expert-approved aftercare tips, healing timelines, and common mistakes to avoid, so you can enjoy your new conch piercing safely and beautifully.
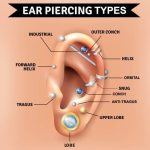
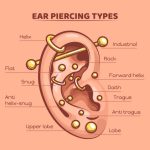
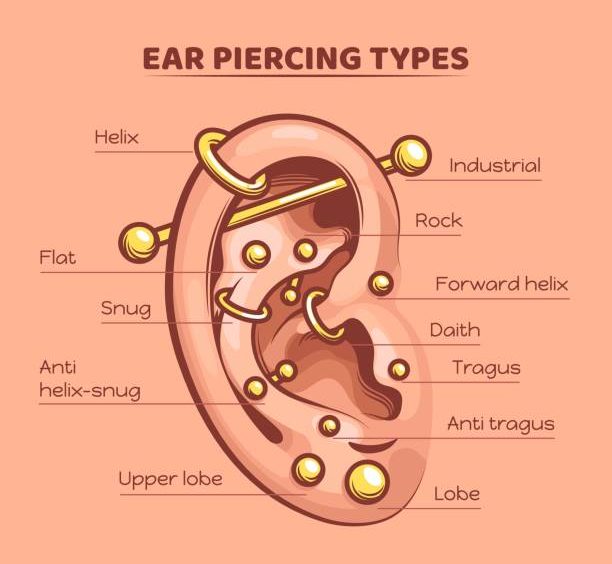
What Is a Conch Piercing?
A conch piercing is located in the center part of your ear cartilage, resembling the spiral shape of a conch shell, hence the name. It comes in two types:
- Inner Conch Piercing – in the middle of the ear.
- Outer Conch Piercing – closer to the edge of the ear cartilage.
This piercing looks elegant and bold, but because it passes through thick cartilage, it needs extra care during the healing period.
Understanding the Healing Process
The healing time for a conch piercing typically ranges from 6 to 12 months, depending on your body and how well you follow aftercare routines.
During the first few weeks, your ear may feel sore, swollen, or slightly red. This is normal. However, consistent cleaning and gentle care can drastically shorten recovery time and reduce discomfort.
Essential Conch Piercing Aftercare Tips
Here are proven aftercare steps from piercing professionals to promote fast and healthy healing.
1. Clean with Saline Solution Twice Daily
Use a sterile saline spray or solution to clean your piercing. This helps remove bacteria and keeps the wound hydrated.
How to use:
- Wash your hands before touching your piercing.
- Spray the saline directly or soak a cotton pad and gently press it against the area for 2–3 minutes.
- Let it air dry. Do not wipe with a towel or tissue.
Avoid alcohol-based products or hydrogen peroxide; they can dry out and irritate the skin.
2. Avoid Touching or Rotating the Jewelry
It’s tempting to adjust your jewelry, but frequent touching introduces bacteria and delays healing. Let your piercing stay in its natural position until it’s fully healed.
If your jewelry feels tight or painful, consult your piercer instead of trying to fix it yourself.
3. Sleep on the Opposite Side
Pressure from sleeping on your pierced ear can cause irritation and swelling. Always sleep on the opposite side or use a travel pillow with a hole in the middle to keep pressure off your ear.
4. Keep Hair, Phones, and Earbuds Away
Avoid anything that touches your piercing frequently. Hair products, dirty phones, and earbuds can introduce bacteria. Keep your hair tied back and clean your phone regularly.
5. Be Gentle When Cleaning and Showering
Use warm water to rinse away any buildup around the piercing after showering. Never scrub the area, just pat it dry gently with a clean paper towel or sterile gauze.
6. Watch for Signs of Infection
Normal symptoms include mild swelling and tenderness, but you should seek medical advice if you notice:
- Persistent redness or pain
- Yellow or green discharge
- Severe swelling or bleeding
- Fever or chills
Early treatment prevents complications and ensures faster recovery.
Do’s and Don’ts for Faster Healing
Following simple dos and don’ts can make a huge difference in healing time.
Do’s
✅ Clean twice daily with saline solution
✅ Use hypoallergenic jewelry (like titanium or surgical steel)
✅ Eat healthy foods rich in vitamins and zinc
✅ Stay hydrated to promote tissue repair
✅ Visit your piercer for regular check-ups
Don’ts
❌ Don’t change jewelry too soon (wait at least 6 months)
❌ Don’t apply alcohol or antiseptics directly on the piercing
❌ Don’t remove crusts forcefully; let the saline soften them
❌ Don’t swim in pools, lakes, or oceans until healed
❌ Don’t sleep on the pierced side
What to Expect During Each Stage of Healing
Stage 1: Initial Healing (0–3 Weeks)
Your piercing is most sensitive. Expect redness, minor swelling, and occasional crusting. Clean gently with saline twice a day.
Stage 2: Middle Healing (1–3 Months)
Pain reduces, and the area starts forming new tissue. Continue your cleaning routine, and avoid unnecessary touching or pressure.
Stage 3: Final Healing (3–12 Months)
The piercing feels normal, but still heals internally. Maintain cleanliness and avoid changing jewelry too early.
Best Cleaning Solutions for Conch Piercing
You can buy a pre-made saline spray from a pharmacy or make your own by mixing:
- 1 cup of warm distilled water
- ¼ teaspoon of non-iodized sea salt
Stir until dissolved and use twice daily. Never increase salt quantity it can dry out your skin and slow down healing.
Choosing the Right Jewelry for Healing of Conch Piercing
After a conch piercing jewelry you choose matters for comfort and healing speed. Professionals recommend:
- Titanium or Surgical Steel – Hypoallergenic and safe for sensitive skin.
- Flat Back Studs or Hoops – Avoid sharp ends that can irritate the skin.
Wait at least 6–9 months before switching to decorative jewelry.
After Conch Piercing: Managing Pain and Swelling Naturally
Mild discomfort is normal. You can reduce pain and swelling by:
- Apply a cold compress for 5–10 minutes.
- Taking over-the-counter anti-inflammatory medication (if necessary).
- Avoid salty or spicy foods that may increase inflammation.
Common Mistakes That Delay Healing
Even with good intentions, many people make mistakes after a conch piercing that slow down recovery:
- Over-cleaning with harsh chemicals
- Removing jewelry too early
- Ignoring irritation bumps or infection signs
- Using unsterile cotton or towels
Consistency and patience are key. Healing takes time, but proper aftercare ensures the best results.
How to Handle a Conch Piercing Bump
Small bumps may appear during healing. These are usually caused by irritation or pressure, not infection.
To treat:
- Keep cleaning with saline
- Avoid sleeping on the piercing
- Do not squeeze or pop the bump
If it persists, consult a professional conch piercer for advice.
How Long Before You Can Change Your Jewelry after a Conch Piercing
Avoid changing your jewelry until your conch piercing is fully healed, usually around 9–12 months. Changing too early can cause inflammation, scarring, or reinfection.
If you’re unsure, visit your piercer for an assessment before switching jewelry.
Professional Advice for Long-Term Care Of Conch Piercing
Even after your piercing heals, regular care is important. Clean it weekly, remove buildup, and avoid trauma to the area.
Keep in mind: cartilage piercings heal more slowly than earlobes and can close quickly if jewelry is removed for too long.
Conclusion
A conch piercing adds elegance and individuality to your look, but aftercare is the key to keeping it beautiful and infection-free. By following these expert aftercare tips, cleaning gently, avoiding unnecessary touching, and using the right jewelry, you’ll ensure fast, smooth healing and long-lasting results.
Remember: patience and consistency always pay off when it comes to body piercings.
For more information: Bloggingshub.com
FAQs
1. How long does it take for a conch piercing to heal completely?
Conch piercing is typically between 6 to 12 months, depending on individual healing speed.
2. Can I clean my conch piercing with alcohol?
No. Alcohol dries out the skin and delays healing. Use a saline solution instead.
3. When can I change my conch piercing jewelry?
After 9–12 months, once your piercer confirms full healing.
4. Why does my piercing have a bump?
It’s usually irritation, not infection. Keep cleaning with saline and avoid pressure.
5. Is swimming safe with a new conch piercing?
Avoid swimming in pools, lakes, or the ocean until your conch piercing is fully healed.