


Conch Piercing Aftercare: Expert Tips for Fast Healing
Conch Piercing Aftercare: Expert Tips for Fast Healing
A conch piercing looks bold, clean, and stylish, but proper healing is where the real work begins. Conch piercing aftercare is not complicated, but it does demand consistency, patience, and attention to detail. Since the conch passes through thick ear cartilage, healing takes longer than soft tissue piercings, and small mistakes can delay recovery.
In the first few weeks, your goal is simple: protect the piercing, keep it clean, and avoid unnecessary irritation. If you build the right habits early, your healing process becomes smoother, faster, and far less stressful.
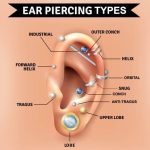
Understanding the Healing Process
Before jumping into routines, it’s important to understand what your body is doing. A conch piercing is essentially a controlled wound, and your body responds in phases, each with its own signs. If you want a broader perspective on what to expect from the process, you can read more in this in-depth ear piercing guide that explains healing stages and care basics.
In the beginning, swelling, redness, and mild soreness are completely normal. This is your immune system at work. You may also notice a clear or slightly yellow fluid forming a crust around the jewelry. This is lymph fluid, and it’s a positive sign of healing, not infection.
As weeks pass, swelling decreases, but the inside of the piercing remains delicate. Even when it looks healed, the internal tissue continues rebuilding for months. That’s why rushing the process often leads to irritation or complications.
The Golden Rule of Conch Piercing Aftercare
If there’s one principle that defines successful healing, it’s this:
Clean it consistently, and leave it alone.
Most problems don’t come from lack of care; they come from over-handling. Touching, twisting, or adjusting the jewelry introduces bacteria and disrupts healing tissue. Even clean hands can carry enough microbes to irritate.
So, discipline matters more than effort. Doing less but doing it correctly is the real strategy.
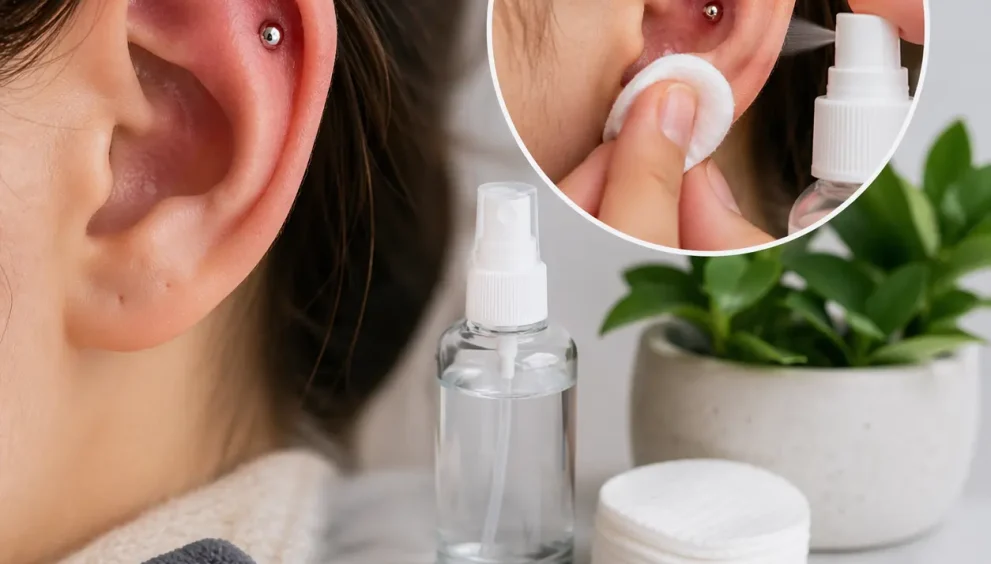
The Ideal Cleaning Routine
A proper cleaning routine is the foundation of conch piercing aftercare. It should be simple, gentle, and consistent.
Start by washing your hands thoroughly. Then use a sterile saline solution—this is the only recommended product. Spray or apply it to both sides of the piercing and let it sit for about 30–60 seconds. This softens any buildup and helps flush out debris.
After that, gently pat the area dry using a clean paper towel or sterile gauze. Avoid cloth towels, as they can carry bacteria or snag jewelry.
Repeat this process twice daily, once in the morning and once at night. More than that can actually slow healing by drying out the tissue.
What to Avoid During Healing
Many aftercare mistakes come from using the wrong products or habits. Avoid these completely:
- Alcohol or hydrogen peroxide (too harsh, damages healing cells)
- Homemade salt solutions (incorrect ratios can irritate the skin)
- Ointments or creams (they trap bacteria and block airflow)
- Touching or rotating jewelry unnecessarily
Your piercing does not need aggressive treatment it needs a stable, clean environment.
Managing Daily Life with a Healing Conch
Healing doesn’t happen in isolation. Your everyday habits directly affect your piercing, often more than cleaning itself.
Sleeping is one of the biggest challenges. Pressure on cartilage can cause swelling and prolong healing. If you’re a side sleeper, using a travel pillow is highly effective. Place your ear in the center gap to avoid contact.
Hair care also requires attention. Strands can easily wrap around jewelry, causing painful snags. Be slow and careful when brushing or styling. Similarly, avoid letting hair products like sprays or gels touch the piercing.
Headphones are another concern. In-ear earbuds should be avoided completely during early healing. They introduce bacteria and apply pressure from inside the ear. Over-ear headphones are safer, but only if they don’t press against the piercing.
Why Water Exposure Is Risky
It might seem harmless, but swimming is one of the biggest risks during healing. Pools, lakes, and oceans all contain bacteria that can enter the piercing.
Even chlorinated water is not safe it can irritate tissue and delay recovery. For the first few months, avoid submerging your ear entirely. Showering is fine, but direct exposure to untreated water should be minimized.
Think of your piercing as an open wound. Until it closes internally, it needs protection from contamination.
Recognizing Normal vs Problem Signs
Not every discomfort means something is wrong. Learning the difference between normal healing and warning signs is critical.
Normal signs include:
- Mild swelling or redness
- Occasional soreness
- Clear or slightly yellow crust
Warning signs include:
- Thick, green, or dark discharge
- Strong odor
- Intense heat around the area
- Increasing pain instead of improvement
If symptoms worsen instead of improving, it’s important to seek professional medical advice.
Dealing with Irritation Bumps
One of the most common issues during conch piercing aftercare is the irritation bump. It often looks like a small pimple near the jewelry and can appear even weeks after the piercing. If you want to understand why these issues happen and how to handle them properly, you can explore this detailed guide on typical piercing complications and practical solutions.
This is usually not an infection. It’s a reaction to irritation often caused by pressure, movement, or improper cleaning.
The solution is not aggressive treatment. Instead, identify and remove the cause. That might mean changing sleeping habits, avoiding touching, or sticking strictly to a gentle cleaning routine.
In most cases, the bump fades on its own once the irritation stops.
Healing Timeline: What to Expect
Conch piercings take time; there’s no shortcut. While everyone heals differently, a general timeline looks like this:
- Weeks 1–4: Swelling, redness, tenderness
- Months 1–3: Reduced swelling, occasional crusting
- Months 4–6: External healing appears complete
- Months 6–12: Full internal healing
Even if the piercing feels fine early on, internal tissue may still be fragile. That’s why patience is essential for long-term success.
When to Change Jewelry
Changing jewelry too early is one of the most common mistakes. It can reopen the wound and restart the healing process.
Before changing anything, your piercing should meet these conditions:
- No pain or tenderness
- No discharge or crusting
- No redness or swelling
- Jewelry moves comfortably without resistance
For most people, this takes at least 6–9 months, sometimes longer. If unsure, it’s always safer to wait.
Practical Tips for Faster Healing
While you can’t speed up biology, you can support it effectively:
- Maintain a consistent cleaning schedule
- Avoid unnecessary touching
- Sleep without pressure on the piercing
- Keep hair and accessories away
- Stay patient and avoid rushing changes
Healing is less about doing more and more and more about avoiding disruption.
Final Perspective
Conch piercing aftercare is not about complexity; it’s about discipline. The difference between a smooth healing experience and months of irritation often comes down to small daily choices.
If you stay consistent, avoid common mistakes, and respect the healing timeline, your piercing will settle naturally and look exactly how you imagined.
In the end, a well-healed conch piercing isn’t just about appearance; it’s proof that you managed the process correctly from start to finish.